Google Identity Configuration
Please follow these steps to set up the prerequisite configuration for using Google Identity as the identity provider in your FojiSoft tenant.
Create Google OAuth Client Application
Go to API & Services credentials page: https://console.cloud.google.com/apis/credentials
Click "Create Credentials" and select "OAuth client ID"
Complete the form:
- Application type: Web application 2. Name: FojiSoft
- Authorized redirect URIs:
- Authorized redirect URIs: https://identity.foji.io/providers/google/login
Click "Create"
Copy the Client ID and Client Secret from the modal dialog
- This is the information we need to configure the authentication on our end
The Google Cloud Platform application needs to be configured with at least the following scopes:
• .../auth/userinfo.email
• .../auth/userinfo.profile
• openid
Initial FojiSoft Configuration
Follow the steps outlined below to create a new data connector for Google Identity in Foji:
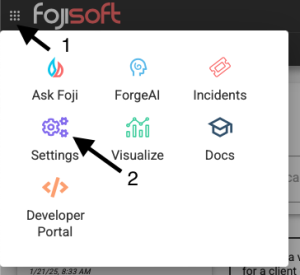
- Click the menu icon (three horizontal lines) in the top-left corner of the dashboard (indicated as
1in the first image). - From the dropdown menu, select Settings (marked as
2in the first image).

Step 2: Access the Connections Section
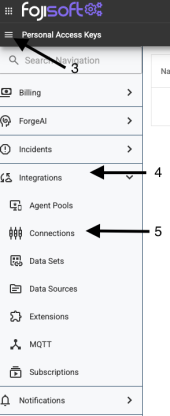
- In the side navigation panel, locate and click on the button next to Personal Access Keys (marked as
3in the second image). - Scroll down and expand the Integrations section (marked as
4). - Select Connections from the dropdown menu (marked as
5).

Step 3: Add a New Connection
- Click the + NEW CONNECTION button located in the top-right corner (marked as
6in the third image).

Step 4: Choose Google Identity
- In the "New Connection" dialog, navigate to the Identity section.
- Locate Google Cloud Identities and click the + ADD button next to it (marked as
7in the fourth image).
Step 5: Configure the Google Identity Connection
- Fill in the following fields in the configuration form:
- Name: Provide a name for your connection (e.g., "Google Identity Connector").
- Folders: Specify the folder path if required (leave blank for most use cases).
- Client ID: Enter the Client ID obtained from your Google Cloud project.
- Client Secret: Enter the Client Secret obtained from your Google Cloud project.
These fields are illustrated in the fifth image.
- Once all fields are filled out, click Create to finalize the connection.

Additional Notes
- Ensure you have the necessary permissions in your Google Cloud project to generate the Client ID and Client Secret.
- If advanced folder configurations are required, consult your organization's technical documentation.
- For troubleshooting, refer to contact support.